One rule, three lengths
The trekking pole guides agree on the arithmetic even where their tables differ by a step: the flat-trail pole length is your height times 0.68, because that ratio puts the elbow at roughly 90° with the tip on the ground for most body shapes. The slope adjustments follow from the geometry, not from a second table — going uphill the ground rises to meet the tip, so the pole shortens; going downhill the ground falls away, so the pole lengthens — and 5 cm each way is the standard starting adjustment the guides publish.
Flat-trail pole length (cm) = height (cm) × 0.68 — Uphill = flat − 5 cm, Downhill = flat + 5 cm, sold length = nearest 5 cm step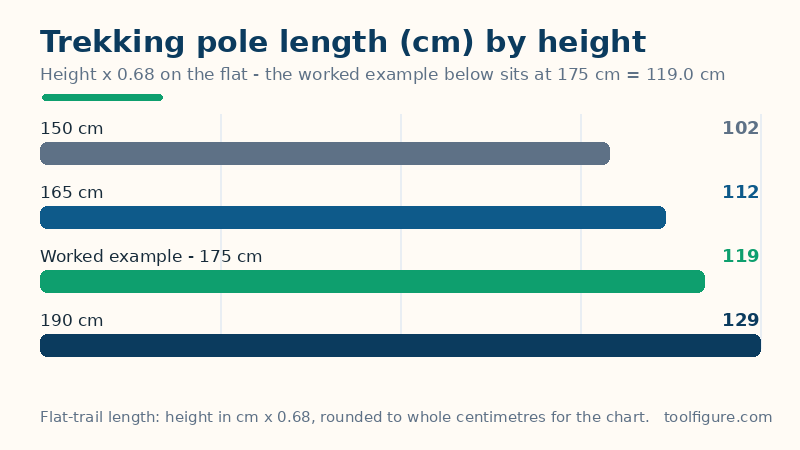
| Height | Height (in) | Flat-trail length | Uphill | Downhill | Sold length |
|---|---|---|---|---|---|
| 150 cm | 59.1 in | 102.0 cm | 97.0 cm | 107.0 cm | 100 cm |
| 160 cm | 63.0 in | 108.8 cm | 103.8 cm | 113.8 cm | 110 cm |
| 165 cm | 65.0 in | 112.2 cm | 107.2 cm | 117.2 cm | 110 cm |
| 170 cm | 66.9 in | 115.6 cm | 110.6 cm | 120.6 cm | 115 cm |
| 175 cm | 68.9 in | 119.0 cm | 114.0 cm | 124.0 cm | 120 cm |
| 180 cm | 70.9 in | 122.4 cm | 117.4 cm | 127.4 cm | 120 cm |
| 190 cm | 74.8 in | 129.2 cm | 124.2 cm | 134.2 cm | 130 cm |
| 200 cm | 78.7 in | 136.0 cm | 131.0 cm | 141.0 cm | 135 cm |
The inch figures are exact conversions (centimetres ÷ 2.54): 150 ÷ 2.54 = 59.1 in, 160 ÷ 2.54 = 63.0 in, 165 ÷ 2.54 = 65.0 in, 170 ÷ 2.54 = 66.9 in, 175 ÷ 2.54 = 68.9 in, 180 ÷ 2.54 = 70.9 in, 190 ÷ 2.54 = 74.8 in, 200 ÷ 2.54 = 78.7 in. The sold length rounds the flat figure to the nearest 5 cm step, because that is how fixed-length poles are sold — adjustable poles simply set to the flat figure itself.
Worked example: 175 cm
A hiker 175 cm tall (68.9 in, about 5 ft 9 in) sets poles to 119.0 cm on the flat (46.9 in), 114.0 cm uphill and 124.0 cm downhill, buying a 120 cm fixed-length pole. The working: 175 × 0.68 = 119.0 exactly; minus 5 cm is 114.0; plus 5 cm is 124.0; and 119.0 rounds to the nearest 5 cm step, 120 cm. Two more spot checks from the same rule: a 165 cm hiker takes 112.2 cm flat (107.2 uphill, 117.2 downhill, 110 cm sold); and a 190 cm hiker takes 129.2 cm flat (124.2 uphill, 134.2 downhill, 130 cm sold). Note the honest disagreement at the tall end: the coarse published bands (under 155 cm → 100 cm, 155–170 cm → 110 cm, 173–180 cm → 120 cm, 183 cm and up → 130 cm) run about 5 cm above the formula for a 183 cm hiker, whose formula length is 124.4 cm against the band's 130 cm — the formula is the finer answer, the band the coarser one, and the elbow test settles which your body prefers.
How to read your result, and its limits
Three checks before a long day out. First, the elbow test overrules the table: stand on flat ground in the boots you hike in, grip the pole with the tip on the ground beside your foot, and the forearm should sit level with the elbow at about 90° — arm length and leg length vary between hikers of the same height, and the guides say so explicitly. Second, adjust on the trail, not just at the start: the 5 cm slope steps are starting adjustments, and very steep ground may call for up to 10 cm — shortening too little uphill forces the arms up and the shoulders with them, and lengthening too little downhill leaves the knees taking the descent alone. Third, fixed versus adjustable is a real choice: fixed-length poles are lighter and simpler but lock you to one number, while adjustable poles cover the flat, uphill and downhill settings on one walk — most guides recommend adjustable poles for varied terrain for exactly this reason.
Common mistakes
- Setting poles once and never touching them. A flat-trail setting carried onto a steep descent is 5–10 cm too short, and the knees pay for it. Adjust at every real change of slope.
- Buying by the coarse band instead of the formula. The four-band tables jump 10 cm at a time and run high at the tall end; the × 0.68 figure is the finer starting point, checked by the elbow test.
- Measuring height without boots. Hiking boots add height, and the pole length is measured to the ground you stand on — measure in the boots you hike in.
- Going longer for more support. Poles longer than the elbow test allows push the arms up, strain the shoulders and reduce control on descents — longer is not stronger here.
Related tools: Ski Pole Length Calculator — Your alpine pole length from height and skiing style: height times a style factor, rounded to the 5 cm steps poles are sold in; Kayak Size Calculator — Your kayak size from height and weight: length range, volume class and minimum capacity; Paddleboard Size Calculator — The right stand-up paddleboard from your weight, use and skill: minimum volume, length range and width from one published rule, shown openly.
Frequently asked questions
What length trekking poles do I need?
Height × 0.68 on the flat: a 175 cm hiker takes 119.0 cm, shortened to 114.0 cm uphill and lengthened to 124.0 cm downhill. Then check with the elbow test — forearm level, elbow at about 90° with the tip on the ground — which overrules any table.
Should trekking poles be shorter uphill and longer downhill?
Yes: uphill the ground rises to meet the tip, so shorten the poles by 5 cm (up to 10 cm on very steep ground); downhill the ground falls away, so lengthen them by the same amount. Adjusting on the trail, not just at the start, is what protects the knees.
Are adjustable or fixed-length trekking poles better?
Adjustable poles for varied terrain, because one walk needs three lengths — flat, uphill and downhill — and fixed poles lock you to one number. Fixed poles are lighter and simpler, and suit flat, even ground where one setting does the whole walk.
Why do trekking pole size charts disagree?
Because some charts use coarse 10 cm bands while the formula gives a finer figure: the bands run about 5 cm above the formula at the tall end (a 183 cm hiker is 124.4 cm by the formula, 130 cm by the band). Use the formula as the starting point and the elbow test as the verdict.